Plantation design
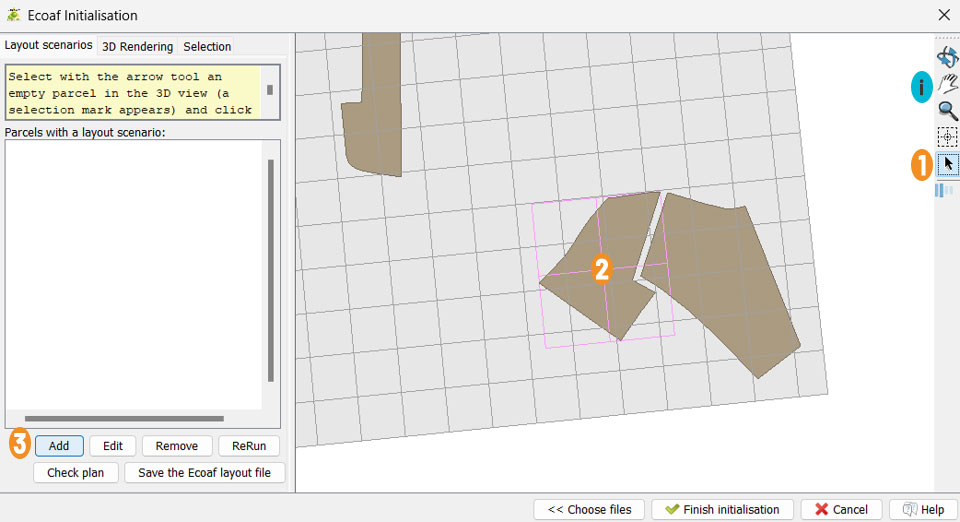
Choosing a plot
1 Click on the arrow
2 Click on the plot surrounded by pink
3 Click on the button Add
Info
Use these icons to browse the plot
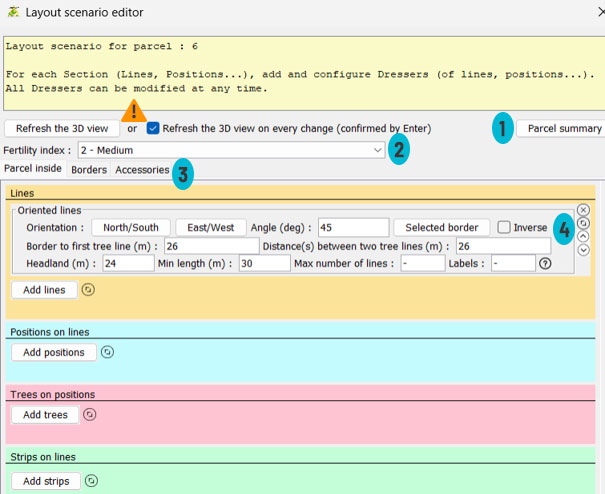
Layout scenario editor interface
Information
1 Button Parcel summuary : Synthèse d’aide visible à tout moment
2 Field Fertility index
3 Tabs Parcel inside / Borders / Accessories : Layout of the interior of the plot, borders and accessories
4 Tools : Delete, reduce or move a frame
Warning
Button Refresh the 3D view or tick box Refresh the 3 D view on every change (confirmed by Enter) : before moving on to another section, click on the button or tick the box and press the Enter key on the keyboard after a greyed-out section has been filled in or changed.
Find the starting point and orientation of a line
-
The starting point of the first line is defined in EcoAF by its distance from the edges around it: Headland (m), and the distance between the line and the nearest edge is defined by Border to the first tree line (m): find what works best in QGIS, and if there is a problem, draw a new polygon.
-
EcoAF proposes drawing lines parallel to one of the borders, or giving an angle to these lines.
-
If neither the borders of a parcel nor those of a new polygon are suitable, you need to define an angle.
-
To find it, use the "Measure an angle" tool in QGIS.
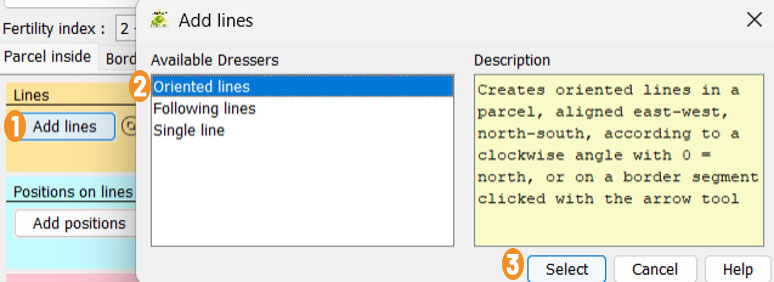
Add oriented parallel lines
1 Click on the button Add lines
2 In the list Available Dressers, Click on Oriented lines
3 Click on the button Select
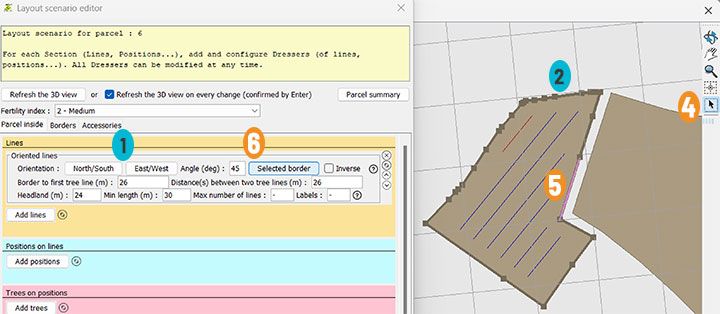
4 Click on the arrow
5 Click on the border turning pink.
6 Click on the button Selected border : The angle changes and so do the lines in the image. The first is in red; if you click on reverse it will start from the opposite edge.
Information
1 Fields Orientation et Angle: Several choices for the orientation of the lines: orientation like North/South or East/West, give an angle.
2 or align to a border.
Note
The layouts are displayed with automatic data for large-scale crops. You can change everything.
Special case no. 1: lines from a QGIS location map
-
Field Angle : Enter the angle determined by an analysis in QGIS, decimal precision (e.g. 139.77).
-
Field Tournière : Enter the distance between the start of the line and the nearest perpendicular edge, as marked on QGIS.
-
Field Longueur min : Set the desired distance between the first line and the nearest 'facing' border, as marked on QGIS.
Special case no. 2: Border to first line of trees smaller than Tournière
By default Bordure à la première ligne d’arbres is greater than or equal to Tournière (example: 26 m et 24 m) : Tournière is given priority, as it is calculated around the entire perimeter of the plot.
Info
If you enter a lower number (e.g. 5 m instead of 26 m), the first line will actually be drawn at the headland (here at 24 m), with a warning message.
- Solution 1: Declare (for example) 5m for Bordure à la première ligne d’arbres and 5m for Tournière. Then in the fitter Positions sur les lignes, increase Marge de départ and Marge finale, by 2m, for example: (24-5)+2 i.e. 21m, so the real headland will be 24m.
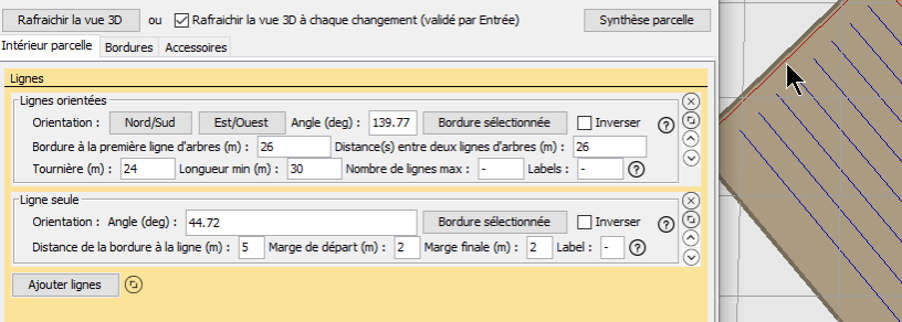
- Solution no. 2: First create a Ligne seule then arrange Lignes à la suite parallel
Single line: practical for creating hedges
By adding a Ligne seule, a hedge is placed 5m from the border (red line), if it is then selected.
Lines in a row and gaps between lines
-
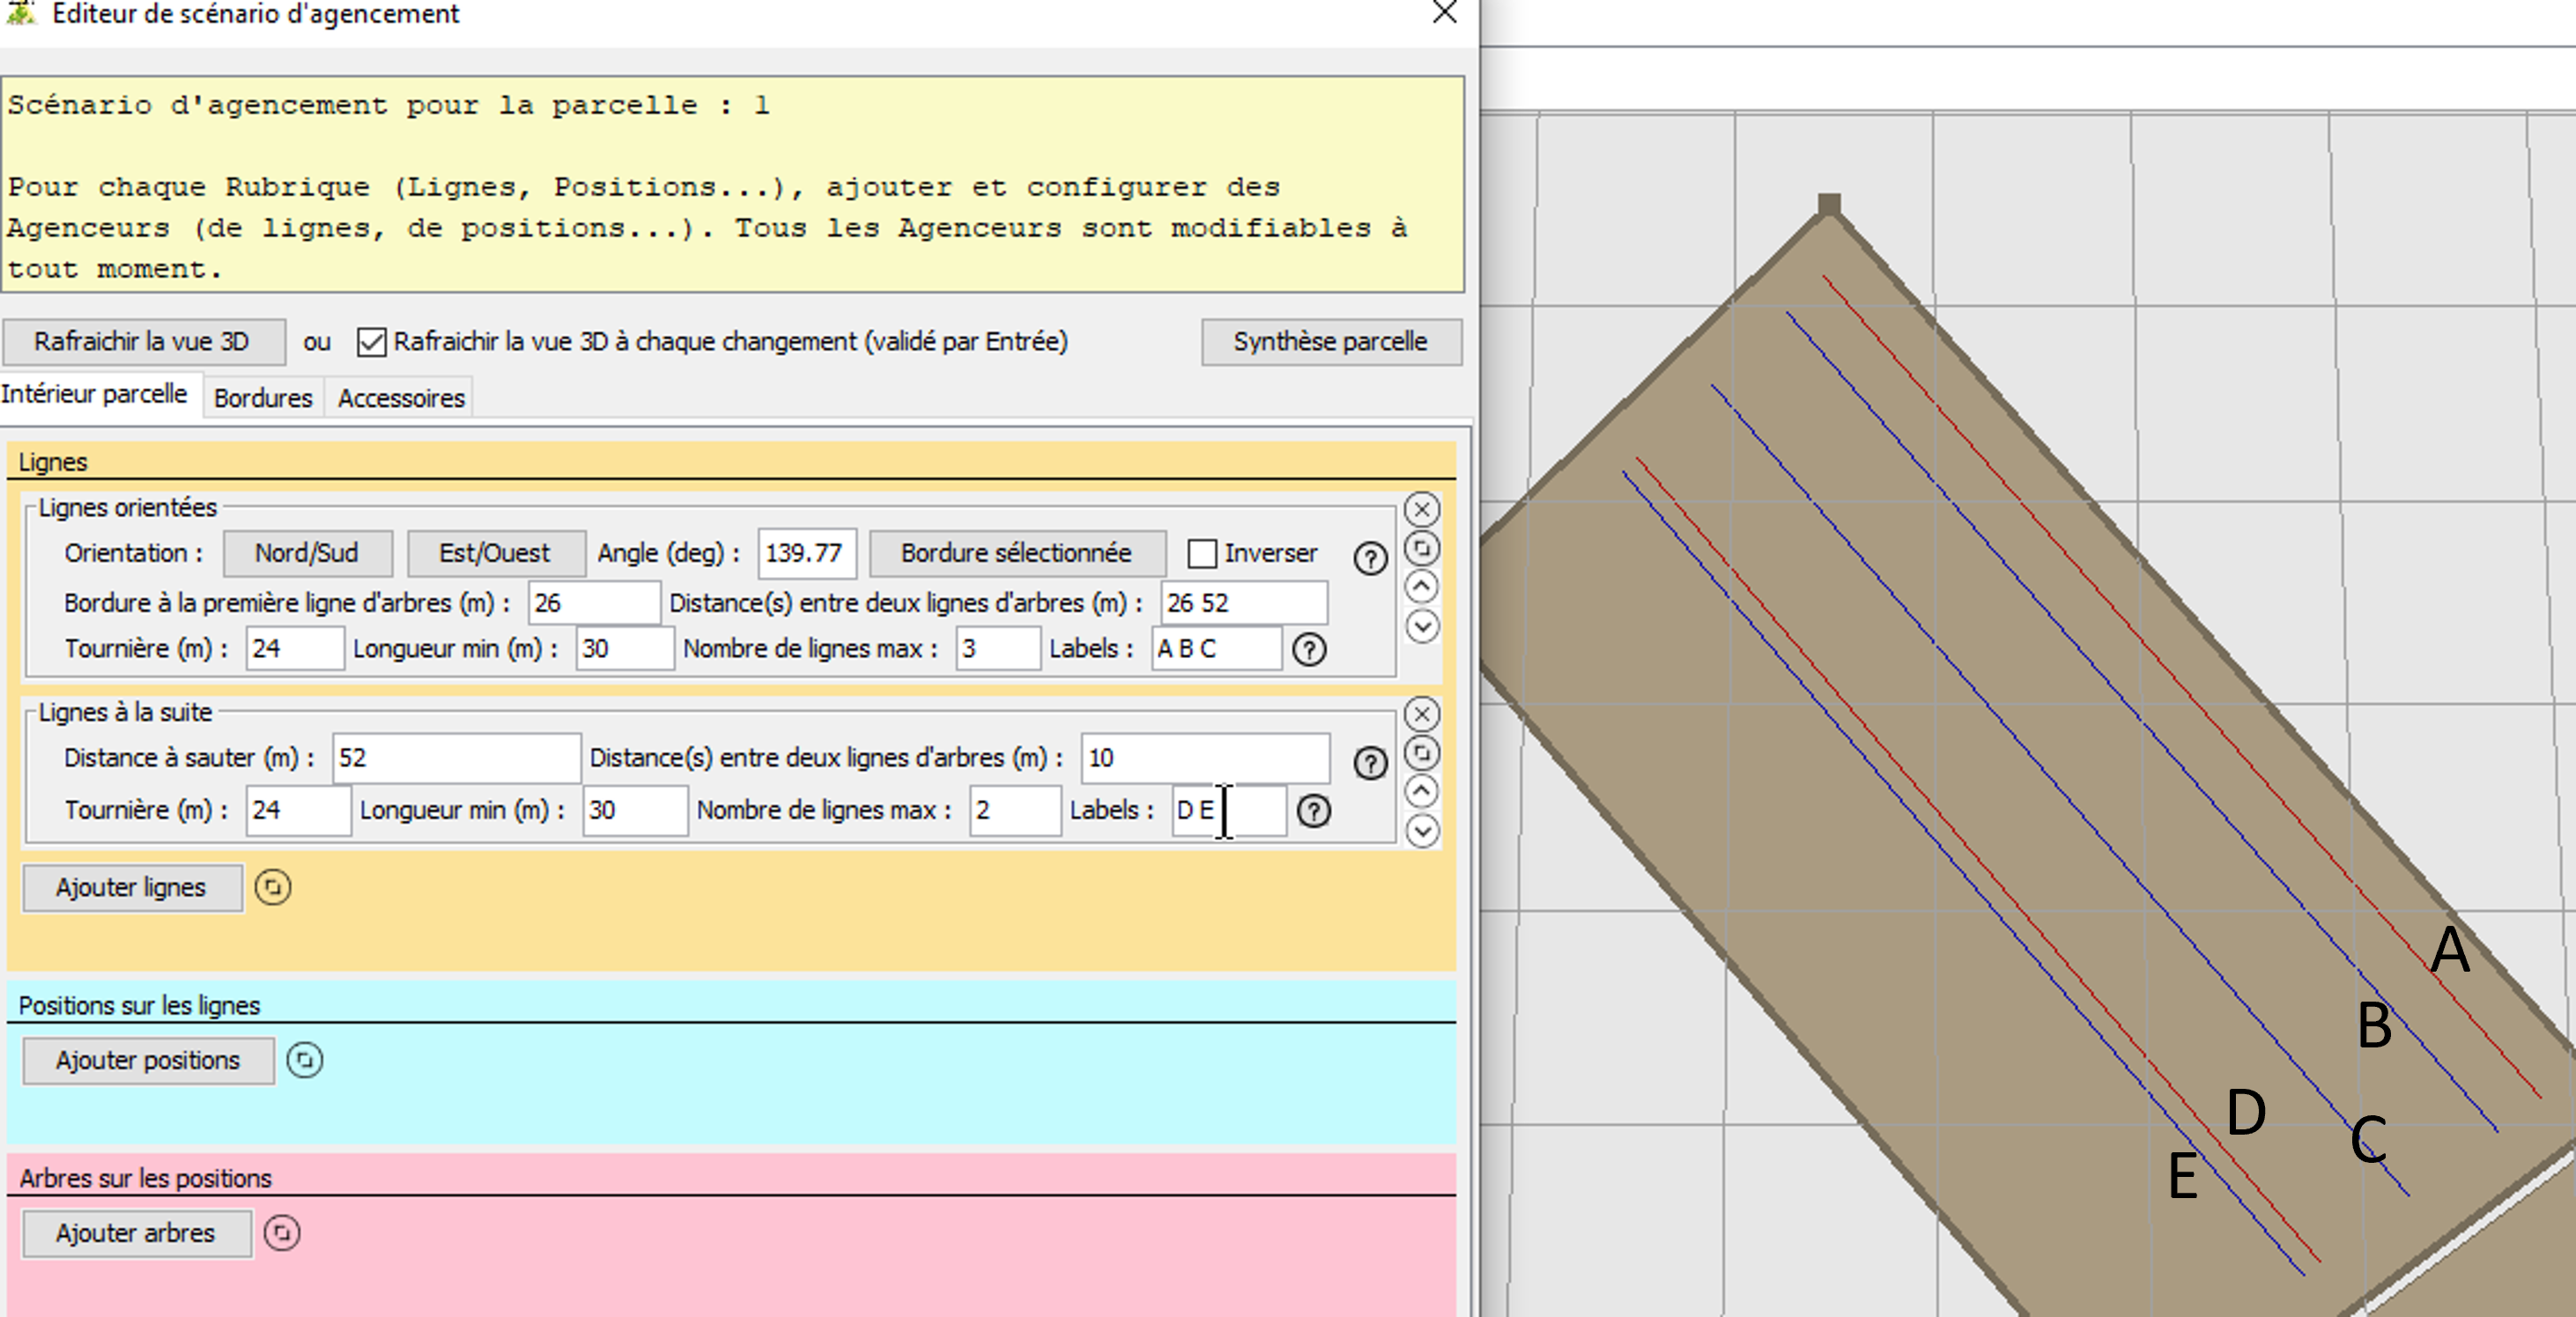
Field Distance(s) entre deux lignes d'arbres : All possible distances between lines.
-
Fields Labels : Labelable lines, here A B C, then D E, to differentiate their treatment; the pattern is repeated as long as there is space.
Note
in CAPSIS, numbers or letters can appear in 2D but not in 3D as in this window; here A to E have been added "by hand"!
Labels for lines
Line labels in upper case and position labels in lower case.
-
Convention: start the name of a line with a capital letter. This makes it easier for everyone to find their way around when sharing layouts with colleagues; examples: A B C, A1 A2 A3, North South...
-
Lines with patterns: Make repeated patterns until the space is filled, for example Labels : A B B and Nombre de lignes max : 10 will lead to A B B A B B A B B A.
-
Any lines: Declare in full.
Example: the plot contains 4 lines which I label TRUC dans l’agenceur de lignes. I put it alisiers (a), mûriers (m), chênes (c), pommiers (p). On the line T, I label with a m c p, and I write it all down m a c c p m c a… On the line R, I label apple trees differently depending on whether they are arranged as singles or doubles : p pp m p p p m p m m pp.
- Distances between lines in the line arranger, between positions in the position arranger: in the same way, this can be a pattern or declared in full: for example, if we decide to put
Add positions
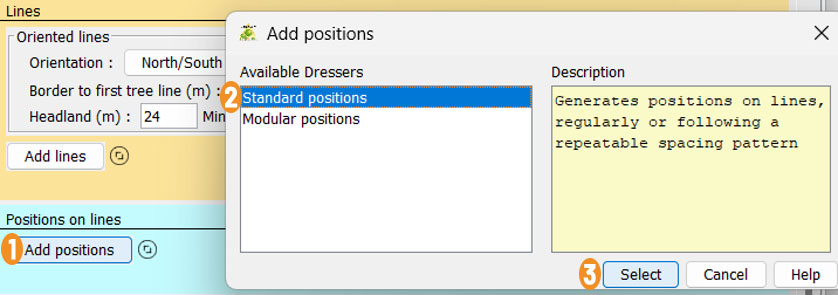
Adding standard positions
1 Click on the button Add positions
2 In the list Available dressers, click on Standard positions
3 Click on the button Select
-
Field Spacing(s) : The spacing between each position. Repeats to the end of the line.
-
Field Approximation (m) : The position will be shifted within this radius, and on the line if the On the line box is ticked.
-
Field Tags : to place different trees in complete series, in sequences, or random with %.
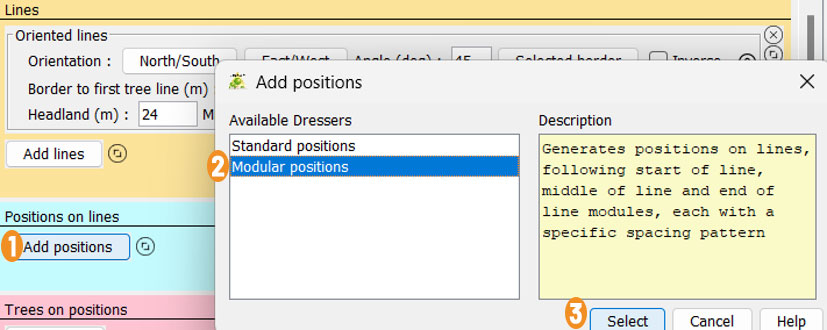
Adding modular positions
1 Click on the button Add positions
2 In the list Available dressers, click on Modulars positions
3 Click on the button Select
-
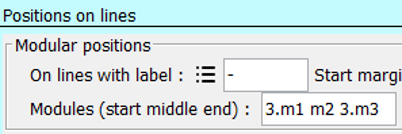
Field On lines with label : Used to customise modules: start middle end. Put "-" if nothing.
-
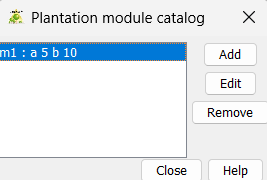
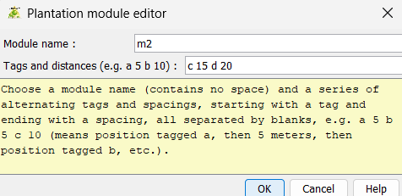
Button Module catalog : The module catalogue for creating, editing or deleting modules.
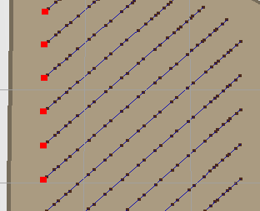
Modular position display
Labels on positions
Line labels in upper case and position labels in lower case.
-
Positions/approximations Randomly place eight species with percentages, for example: I label the positions 20%a1 5%a2 3%a3 2%a4 40%a5 7%a6 9%a7 14%a8 : EcoAF will assign a species to each position according to the declared probability. It is not possible to mix species with hazards and without hazards: make 2 mixers and play with the empty positions or the spacing between positions.
-
Empty positions Place empty positions: I label with 0 but I wouldn't attribute any tree planter to 0, for example, I declare a systematic distance of 10 m and label a whole line in the position finder 0 m 0 0 a.
-
Variables positions Place trees/shrubs at different intervals, for example: Label m n s n et Spaces 2 5 5 2.
-
Positions with an alea of x metres around the theoretical position Replace 0 by a number x in the position arranger, box Alea: the position will be placed within a radius of x metres if On Line is unchecked, to the left or right only if On Line is checked.
Placing trees on positions
-
The first two Adders are dedicated to planting young plants when you have no indication of their future growth or just want a plot design.
-
The next two are suitable for planting young seedlings when diameter measurements are available for the same species and equivalent conditions, or to represent existing trees whose diameters can be estimated: hedges, lines planted before, forest edges, etc.
-
The last is dedicated to fruit trees for which we need an estimate of fruit production.
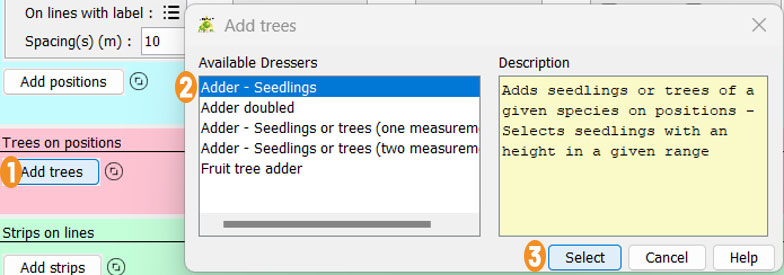
1 Click on the button Add trees
2 In the list Available dressers, Click on Adder - Seedings
3 Click on the button Select
Addition - Duplicate plants
-
Field On positions tagged : The species chosen will correspond to this position label. "-" means all positions.
-
Field Species/variety : Drop-down list from treeSpecies. The name of the variety is not specified (-), you can add it in treeSpecies. Type of plant :
-
P = from a forest stand,
-
VG = from a seed orchard,
-
C = cultivar,
-
F = a fruit tree whose production is well known
-
-
Fields Min height and Max height : Planting dimensions, useful for the order file Export plantation
-
Button Choose : Type the abbreviation, vernacular or Latin name to find the species.
Addition of fruit trees
Choose from 6 fruit species whose production over 20 years in arboriculture is described tree by tree. Choose the type of rootstock (strong, medium, weak); an example of a rootstock name is given.
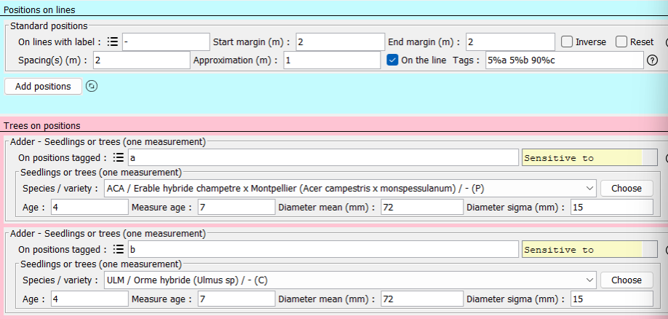
Addition - Plants or trees (one measurement)
-
Field On positions tagged : The species chosen will correspond to this position label. "-" means all positions.
-
Field Species/variety : Choose the species
-
Button Choose : Type a character string to find the species immediately.
-
Fields Age, Measure age, Diameter mean (mm) et Diameter sigma : A few measurements of maple trees (made here on 7 year old trees), to be able to describe these trees which are 13 years old at the start of the simulation, and so their growth will be deduced. This can be a very rough estimate to the eye, to represent trees already present, then put Sigma = ¼ Average (example 38 and 0.25 × 38 = 9.5).
Special case of trees already present, scattered in a meadow
-
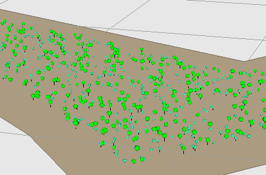
Tick box Reset : Each time you click on this square, or type Enter in a frame, the positions of a, b et c change.
-
Field Approximation : to fill in
-
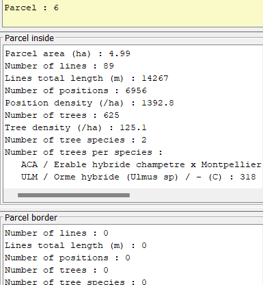
Field Tags : Positions c are not described by a tree planter, so they remain empty; to determine the % of c, approach empirically using Parcel summary below.
Addition - Plants or trees (two measurements)
A few measurements of flowering ash trees are available (here the first measurement is taken at 5 years of age), so you can fill in these 2 lines and the growth of the trees will be deduced.
Note
Values provided when using the DIAFNOSTIC application during betatest at INRAE
Reuse scenario
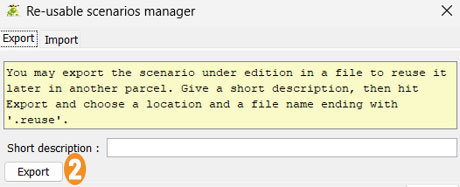
1 Click on the button Re-use
2 Click on the button Export
- Tabs Export and Import : Choose Export (this scenario) and later, in another plot, Import (this one or those in the library of examples).
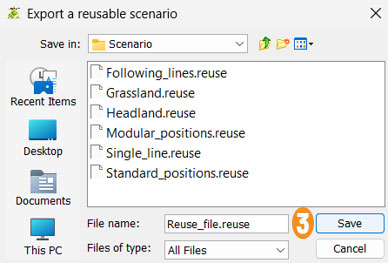
- Field File name : use the suffix .reuse. The scenario only concerns the inside of the plot and not Borders or Accessories.
3 Click on the button Save
If the export was successful, the following message is displayed : The reusable scenario was exported: location path
Plant on the edge or in staggered rows
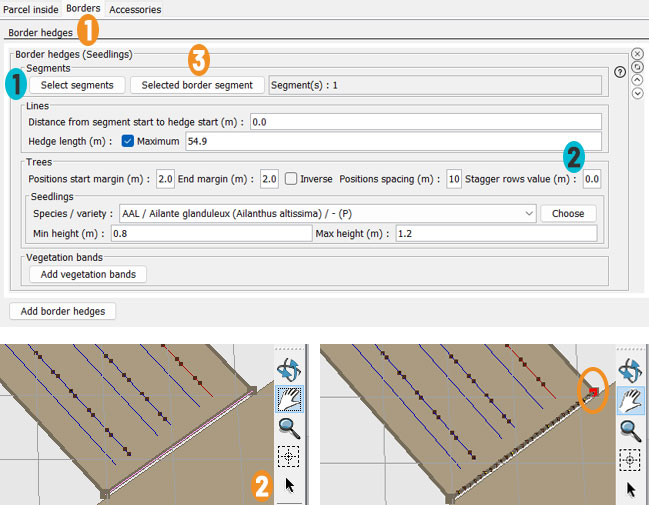
1 Click on tab Borders to arrange the borders.
2 Click on tool arrow, the segment is doubled with a pink line.
Info
Segments are numbered clockwise. Locate the number of a segment before clicking on the tool arrow.
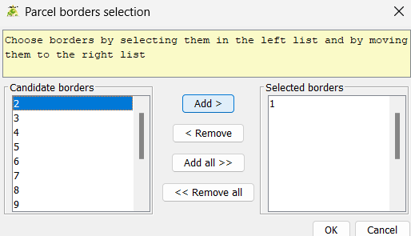
3 Click on the button Selected border segment, the number is displayed (in the example, Segment(s): 1) and a red square shows the 1st position (surrounded by an orange circle in the example).
1 Can also be selected by segment number.
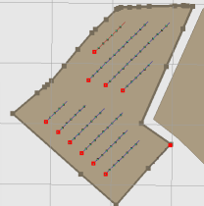
2 Field Stagger rows value (m) and red dot in the following image : First position of this border. The plants are arranged on the border, or staggered on either side.
Info
The label system does not apply to borders. Write a frame for each species, shifting the starting margin. Example of the image above: for a final spacing of 10 m and 3 species, successive starting margins of 2, 12, 22 m, spacing per species of 30 m.
Accessories
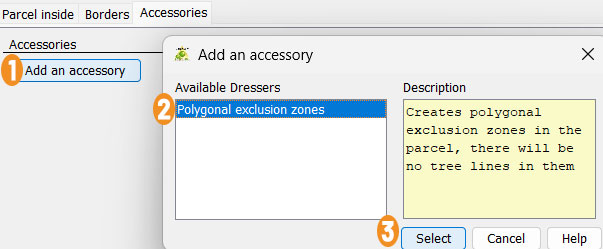
1 Click on the button Add an accessory
2 Click in Available Dressers on Polygonal exclusion zones
Polygonal exclusion zones
can be used to exclude an area containing a pond or path, for example. This accessory only works with a good graphics card.
3 Click on the button Select.
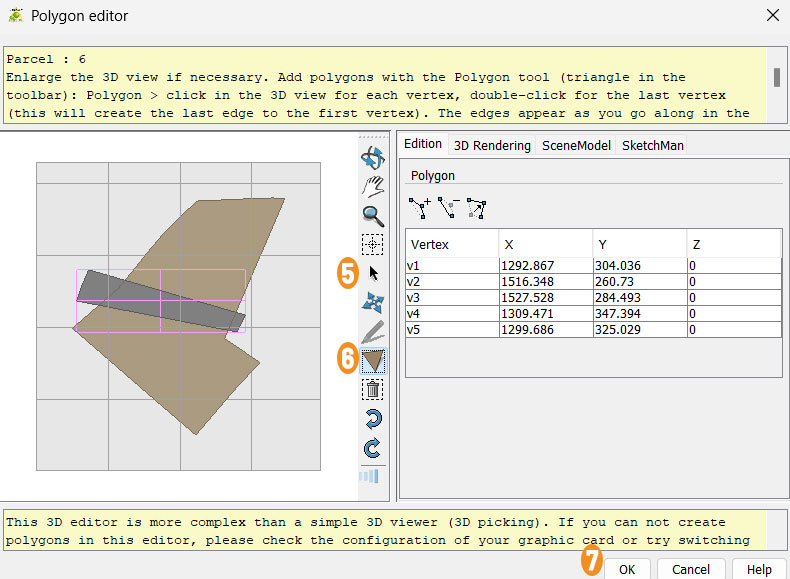
4 Click on the button Add or edit polygons.
5 Click on tool arrow to select the plot.
6 Click on tool polygon to draw the plot.
7 Click on the button OK to confirm.
Save the layout
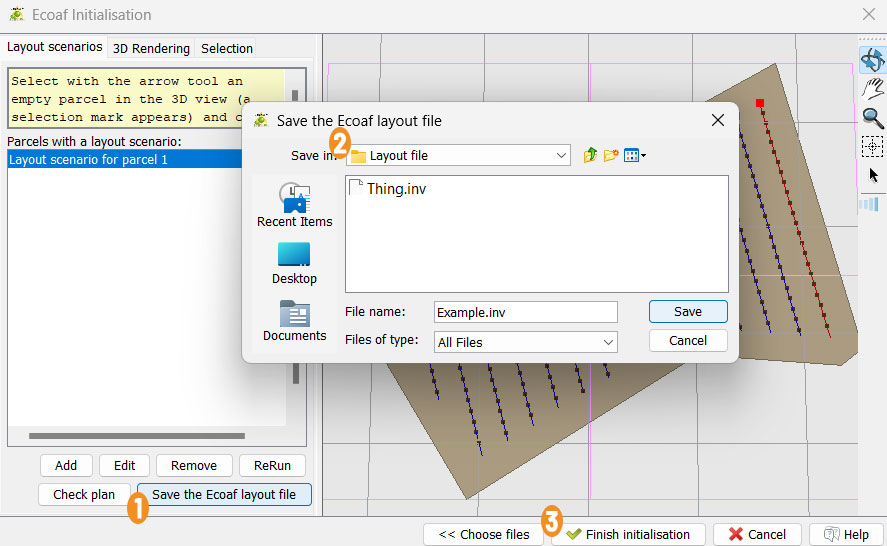
1 Click on the button Save the Ecoaf layout file
2 Click in Save in for the folder location, choose the name and save. Add the suffix .inv for Inventory.
3 Click on the button Finish initialisation.
